2/07/2014

ARTISAN TRUNK SHOW IN RICHMOND, VA AT GLASSBOAT - February 9


GlassBoatLogo 


Local Artisan Trunk Show
Wine and Cheese Social

Sunday, February 9th  4pm ~ 7pm


Join us for cocktail hour to celebrate Local Talent Sunday, February 9th from 4pm - 7pm at GlassBoat in Cary Town!  
We will kick off our LEE Loves Local 40% OFF Custom Order SALE Feb. 9 - 16.  
The following artists will be featured:
August Nine Designs, 
KBenner Designs, 
Amy Mathieux,  
Curly Gurl Art, 
Beryl Robinson, 
McKinsey Bamber Jewelry, 
CanonAshby Jewelry, 
and...

DREAM SPIRAL ART 

Reindeer Moss and Resin Earrings from the "Captured Collection"


Inspired by the myriad of texture and color found in nature, Ann creates timeless metal jewelry designs from a variety of materials that include: sterling silver, gold, copper, enamel, and organic materials such as moss, leaves and lichens that she seals in resin.  All jewelry components are created by hand in her home studio, which is located on the sunny-side of a 100 year-old Virginia farmhouse. 


40% OFF Custom Order 
LEE Industries Furniture
Feb. 9 - Feb. 16


11/22/2013

THE HEAT CHAMPION FIREPLACE IS HERE!

Now that we have piles of wood, thanks to my Wood-Chopping-Champ-Hubby, I am happy to report that we are using the recently installed Heat Champion fireplace!


You may recall that the old fireplace was also a wood burning fireplace, but we rarely used it because with the flue open, it sucked all the heat out of the rest of our house. Because we heat with oil, it was just too expensive (and too cold) to enjoy a fire on a chilly night. Also, since our fireplace happens to be on the enormous side, it just was not efficient at producing heat before.


So, after completing renovations on the hearth and brick facade, we purchased a custom-made Heat Champion unit from Hearth and Home Shoppe. It was installed a few days ago and we have enjoyed a fire pretty much round the clock ever since. The best part is that we are now able to supplement (instead of subtract) the heat in the house just by burning a fire.

 
This new product made by Stoll has a built-in firebox that concentrates the heat and uses internal fans that blow out the warm air produced by the fire, thus heating the house. Due to the ceramic class doors and other insulation, unlike before, we do not seem to lose any heat through the flue when we burn with the doors closed. Plus, isn't the new fireplace a handsome fellow?

Albus the cat is pretty darn handsome, too!


So with the installation of the Heat Champion, our fireplace renovation is now about 80% complete. We only have 2 items left on the list for updating this part of the house:

1). We need to decide what to do for the mantel. We are leaning towards using a rustic wood slab salvaged from the old barn.

2). After we replace the carpet, we need to install trim around the new granite hearth to frame it in.

In the meantime, I think I might grab a good book and go read by the fireplace. It's a tough job, but somebody has to tend to the fire, right?

11/21/2013

A LESSON in CHOPPING WOOD

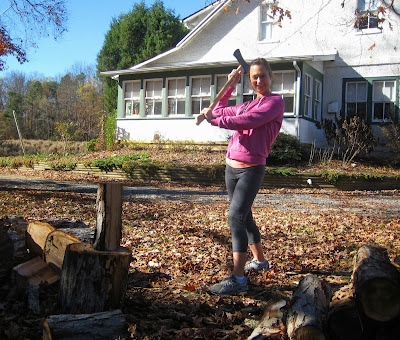
In anticipation of the installation of our new wood burning fireplace, the Mister and I (um, mainly the Mister) have been busily chopping wood. Since a big oak tree fell down in the back of the field last Spring it has become the fortunate first fodder for our new fireplace. So when I say "we" have been chopping wood, really, I mean "he" has been chopping wood. But I enjoyed an embarrassing lesson in the art of wood splitting - something this suburban-born girl has never had to do before.

Here's how it went...


As you can see, I did make contact with my log, but I didn't quite make it through the wood. In fact, my axe got stuck in the top of it. This, by the way, was one of my more successful cracks at it. There is an embarrassing video somewhere that depicts a time when I under-swung and my axe made a mean dent in the dirt. Take that, Dirt!  I am sure with more practice, though, I will be splitting wood like a champ. Or maybe I will just stick to my Zumba and Kettle Bell classes and let the Mister Wood-Chopper chop the wood. 


Ta-da!
We do have a chainsaw, by the way, but that hubby of mine is kind of a survivalist. He likes to do things the old-fashioned way.


11/12/2013

A FOND FAREWELL TO SANTA FE

The SANTA FE TOTEM, one of my favorite one of a kind pieces, recently SOLD at the Stockley Gardens Art Festival!  I was elated (and a tiny bit sad) that this show-stopper, constructed back in 2006, finally found its perfect mate. 

Every one of a kind piece I make tells a story. I wanted to share with you the story of the Santa Fe Totem.


When I was 22, I embarked on a 6 week long RV trip with my boyfriend to explore the cracked red earth, cacti-covered canyons and black night skies. The rugged landscape was so beautiful that at times it brought tears to my eyes. It was in Santa Fe, while wandering in and out of art galleries, including the Georgia O'Keeffe Museum, that I discovered this large Chrysocolla gemstone in a tiny shop in the city center.

The Chrysocolla shows off a turquoise blue-green hue that is interlaced with brown red matrix, like a quiet canyon creek flowing over parched earth. I set the stone with a modified bezel, wrapping around the bottom and side edges, while prongs of 14 karat yellow gold crown it above like a rising sun. The 14 karat gold prongs are echoed below the bezel, connecting the gemstone atop to a rugged landscape of sterling silver. Using recycled sterling silver, manipulated with my torch, I created a highly textured surface reminiscent of the landscape that marked my desert journey.


Chrysocolla is a copper bearing mineral found wherever copper deposits naturally occur, especially in areas of the southwestern USA, Chili, Zaire, Australia, France and England. 
 
Pure Chrysocolla is too soft for jewelry purposes but it is often found in quartz deposits, mixed with malachite, turquoise and azurite, which makes it hard enough to polish for cabochons. Chrysocolla is associated with peace and tranquility, patience, intuition, and unconditional love.  It is thought to offer gentle and soothing qualities to the wearer.
 
 A part of my heart will always belong to the parched red earth of the southwest United States, where this stone was born, but I am happy that this special piece will be worn and cherished close to the heart of its new owner.

9/26/2013

FALL 2013 SHOW LINE-UP

My Fall show schedule is here! I would have posted it sooner but between running my own massage practice and working in the studio, I have been busy working 10 hour days to build up my inventory. I had forgotten what a great Spring season I had that nearly wiped out my jewelry inventory and silly me slacked off over the summer. So without further adieu, I hope you will stop by my booth at one of these upcoming shows.
1000 Blanton Avenue, Richmond, VA 23221
CURRENTLY RUNNING from Sept. 25 - 29
Free and open to the public - check out handmade jewelry, scarves, paintings, pottery and more - all made by local artists.

University of Richmond Campus
28 Westhampton Way
Richmond, VA 23229
 Sunday, Sept. 29 from 11:00 a.m. to 5:00 p.m.  

7th Street Christian Church
4101 Grove Ave, Richmond, VA 23221
 Saturday, Oct. 5 from 10:00 a.m. to 4:30 p.m. 

Held at Stockley Gardens Park in the Ghent section of Norfolk, VA 
Sat., Oct. 19 from 10:00 a.m. to 5:00 p.m. & Sun., Oct. 20 from noon to 5:00 p.m. 

7521 Comanche Drive, Richmond, VA 23225-1141 
Saturday, Nov. 23 from 9:00 a.m. to 3:00 p.m.

8/23/2013

FIREPLACE UPDATE

Remember the old brick fireplace?


Well look at it now!


I've actually been post-poning this BITTER/SWEET fireplace update for a few weeks... read about why below.

The BITTER BITS: 

For the first time on this DIY house, we decided to hire a contractor to complete a project for us. Unfortunately, in addition to spending a lot of money unnecessarily (turns out we could have done it ourselves), the end product was so questionable that there was a possibility that the whole project would have to ripped out and redone.

Why did we hire a contractor in the first place? When we did the demolition, you may remember the big crack that fissured through our over-sized hearth.


Since it is an active wood burning fireplace, we were concerned about structural and safety issues. We assumed that a "professional" would have more knowledge of fireplace code regulations and how to support and level the hearth so it wouldn't crack again.

 
There were many issues with communication and workmanship along the way and we should have listened to our guts and pulled the plug, but we had all the materials ready to go and were so excited to be able to check this project off the list.

After the contractors left we found a chip in our wood floors, grout stains on the carpet, and dried concrete that had dripped down the wall and floor into our basement.  Since the project was left incomplete, we had to do the final coats of grout and tile sealant and we'll also do the wood trim work around the hearth tile.


But the most critical problem was that in the end, the hearth was not properly LEVELED. You can see just how far off level it is on the far right side of the photo, where the metal fireplace face meets the tile - 5/8 inch off, to be exact.

However, we are currently working with fireplace technicians, who have advised that they will be able to make up for the off-level hearth when they install our custom fireplace insert, which means we won't have to rip out and redo the current tile job. Whew!


Lesson learned: If you want it done right; do it yourself.  If you can't do it yourself; do your homework - meet with more than one contractor; get everything in writing regarding the scope of work; don't hire based on a single recommendation or because they are likable; withhold final payment until you are satisfied.

Zillow actually has a good article on Hiring a Contractor

Now on to the HAPPY, SWEET BITS:

We are thrilled with the Shanxi Black Flamed Granite tile that we selected for the hearth.  We had it laid on a diagonal to draw the eye to the fireplace. 


This special granite has a non-traditional finish, in that, it is not shiny, instead, it is torched with fire until the shiny-bits burn off. What is left behind is a textured, matte, stone finish, with a hint of metallic shimmer. This flamed granite works perfectly with our rustic contemporary design aesthetic.

Aside from looking a million times better, the ultimate purpose of our fireplace reno is to be able use it more - without losing heat from the rest of the house, that is. We currently heat with oil, so it can get expensive to reheat this two story house after burning a fire in the winter. We love having fires and would love to be able to actually add to our home's heat efficiency while burning one. 

Over the past year, we have been looking into wood burning fireplace "Heatilator" units that insert into your fireplace and have an electric blower to circulate the warm air produced by the fire around your home. Anybody have one of these? The fireplace doors, made from ceramic glass, are insulated and left closed as the fire burns. The fire is concentrated in a smaller interior firebox. On the outside of the unit, there is an intake fan and at least two blowers to distribute the hot air around the house (I can just see the kitties curled up right in front of the blowers in the winter).

Albus says, "Who me?"
ON-GOING PROJECTS:
1) Finish designing our custom Heatilator unit (yep, our fireplace is way oversized, so it is all custom, baby), order it and pay for it (gulp).  Custom = expensive. 

2)While the Heatilator is being built, I am hoping the hubby will have some time to start constructing our built-in bookshelves that will line the entire wall to the left of the fireplace, and run from floor to ceiling.

3)After the built-ins are complete, we will decide what to do for our fireplace mantel-piece. We are leaning toward a rustic slab of wood - perhaps milled from one of the trees that fell on our property last year.  Like THIS or THIS.  Other ideas include a Stone Slab or a simple Mantel Painted White to match the ultimate color of the built-ins and crown molding that we will install.

Which do you like best?

6/28/2013

Enamel Stud Earrings and a New Shop in Norfolk

So between fireplace renovations, a week-long visit with my parents, a June birthday trip to the beach and an anniversary trip to the mountains, I managed to put together my first order for a little shop in Norfolk, VA, where I will now be consigning. The shop is called, Kitsch, and it features the handmade wares of Virginia artisans.

To stock the new shop, I fired up a batch of enamel stud earrings, expanding the color selection to include: Cherry, Cranberry, Lime, Lemon, Blueberry, Grape and Orange. 


This is how they look right before I fire them with my jewelry torch. 


This is how they look hot off the jewelry bench and ready to sell!

 
You can now find these colorful studs and more Dream Spiral Art designs on the shelves at Kitsch.  Support VA artisans and check it out!

4/24/2013

Fireplace Makeover

This has been a multi-phase project for us and it is still on-going, but I am excited to report our progress so far.

This is the fireplace prior to renovation. It is a brick, wood-burning fireplace with a terra-cotta mosaic hearth. I think this style was very popular in the 1970s in our area. The knotty-pine wood-paneling definitely channels the 1970s.  Definitely not our style. Okay, not "my" style (my husband kind of likes the wood and brick combo - but after 7 years of persistence, I finally convinced him it was time for it to go).


 Step 1: 
Paint the brick with a high-quality primer. I used a tinted primer from Benjamin Moore.


The brick is highly textured and very porous, so after using a brush to do a test patch, I switched to a very thick nap roller and slathered on the primer. I used almost an entire gallon of paint on the 10 foot area.


Since we were planning to paint the brick grey, I choose a grey tinted primer. Little did I know, however, how many shades of grey exist. There are blue greys, yellow greys, green greys, and even brown greys. The primer, it turned out, was in the blue grey family. Because it was a cool color, it ended up making the wood paneling scream orange next to it. Ick. The hubby almost kicked me out of the house when he came home and saw this. 


For weeks I listened to him exclaim, "I can't believe you painted our fireplace blue!"  Color lesson learned. Onward with the renovation. 

Step 2:
Dismantle the Mantle. 
Enough said.


We also removed the small built-in bookcase next to the fireplace in preparation for the next 2 steps: electrical upgrades and drywall. Besides, we will eventually construct a kick-*ss built-in bookcase that spans the entire wall from floor to ceiling.


Step 3:
After updating the electrical wiring on the entire wall (thank you father-in-law), it was time to put up the drywall. Putting up the drywall was the easy part. Taping, sanding, and finishing it was a pain in the you-know-what. We are not drywall finishers, so it took us 5 rounds of layering and sanding down the joint compound before we were satisfied. 

By the way, I do not recommend living in a space while you sand and finish drywall. The process took us at least a couple of weeks because of dry time in between layers and well... we kept procrastinating the unsavory task. After each round of sanding there was a fine layer of drywall dust that blanketed the downstairs. Although we used respirator masks and a shop-vac to protect our lungs, it was still a massive mess, and hard to properly ventilate since is was 10 degrees outside.  Next time we decide to drywall a large room that we are simultaneously trying to live in, we will hire someone else and live in a hotel until the job is finished.


Step 4:
With the drywall finished and primed, it was time to get rid of that blue brick.  Because we usually prefer warm colors, we decided to go with a tan grey for the fireplace brick. Again, because of it's superior coverage over a porous surface, I went with paint from Benjamin Moore. The color is Rockport Grey

For a smoother finish, I filled any holes and gaps between bricks with caulk, prior to rolling on the Rockport Grey topcoat.


Step 5:
After painting the brick and surrounding walls (more on that later), we decided that we didn't want to keep the brick seats that were built-in on both sides of the fireplace. They closed off the fireplace and did not function well as seating. We also felt that the sharp corners were a definite safety hazard should we ever have little ones running around the house.


After manually chiseling out the first 20 bricks (it took us over an hour with chisels and hammers, but was great way to sweat out some frustration), we decided it was time to bring in the BIG guns. So we rented what was essentially a small jack-hammer.


I let the hubs handle that one. He likes his power tools. Meanwhile, I proceeded to ferry the bricks and bits of rubble by the bucket load outside to the trash pile. I did salvage a few of the nicer bricks, just in case I come up with a creative way to re-purpose them down the road. Ideas anyone?


Within an hour, the remainder of the steps and hearth were demolished.


We cleaned everything up with the amazing shop vac. And this is where we are today.

  
Still-To-Do:
*I will prime and paint the now-exposed brick at the base to match the rest.  
*As you can see there is a huge crack in the foundation at the hearth. We need to address the structural issues and level everything off before we can re-tile the fireplace. 
*We are also planning to upgrade our fireplace insert with a heatilator unit so that we can add to the energy efficiency of our house when we burn fires, as opposed to loosing heat from the rest of the house every time we open the flue.
*And lastly, we need a new mantle. Our dream is to mill one of the fallen trees on our property and have a rustic-looking, solid-wood mantlepiece.

4/19/2013

Yellow Room Makeover Re-Cap


 This multi-purpose room is a study that can convert to a guest-room in a flash. 


 I do love red but the color was just too dark for this small, cramped, 9x9 room.

 I had to fix the plaster walls before I could prime them. 


To find out how many coats of paint it took me to cover the red, Click HERE.


The walls are painted Lemon Parfait by Valspar to brighten the space.


I rearranged the furniture and added a modern area rug. 


Adding artwork to the walls and hanging a shelf of travel curios completes this cozy book-nook. 


Handmade artwork, a framed blue morpho butterfly, and a mirror from Morocco add pops of turquoise blue, gold, yellow and green.


My original "Turtle Drum" painting finds the perfect space between birdy prints by LeeArtHaus. Overall the room feels so much bigger and brighter in this cheery shade of yellow.